Copying Documents
You can copy documents by:
- dragging documents to another folder or work area
- using (<Ctrl+C>) and then (<Ctrl+V>)
- using (Copy Document dialog)
Copying documents using drag and drop or copy and paste
- Select one or more
documents and drag them into the destination folder.
or
- Select one or more documents and select Document > Copy (<Ctrl+C>), then select the destination folder and select Document > Paste (<Ctrl+V>), and click Yes when prompted, "Do you want to copy document(s) here?".
- If No Wizard is set as the default method for creating documents, and the destination folder does not already contain any documents having the same document name or file name as those being copied, the selected documents are automatically copied to the selected folder.
- If No Wizard is set as the default method for creating documents, and the destination folder already contains one or more documents having the same document name or file name as those being copied, either ProjectWise will resolve the conflict for you, or you will be prompted to resolve the conflict yourself. See Resolving Document Creation Conflicts.
- If Advanced Wizard is set as the default method for creating documents, the Advanced Document Creation Wizard opens. See To Create a Document Using the Advanced Document Creation Wizard.
- If no default method for creating documents is currently set, the Select a Wizard dialog opens. Select No Wizard or Advanced Wizard, click OK, then follow the instructions in the applicable option above.
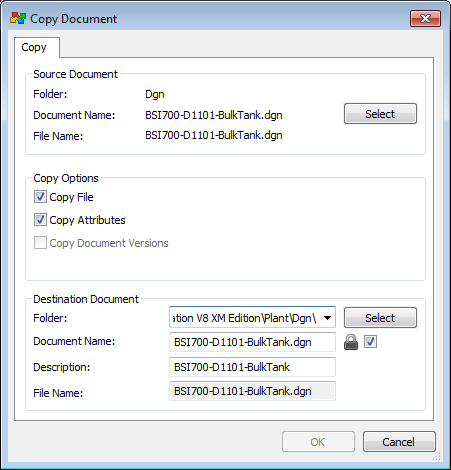
Copying a document using the Copy Document dialog
can only be used to copy one document at a time, and is especially recommended for situations when you want to control whether or not attributes from the source document are copied over to the new document.
- Select a document.
- Select
Document > Copy To.
The Copy Document dialog opens. The document you selected to copy is displayed in the Source Document section.
- In the
Copy Options section, do the following:
- If you do not want the
file that is attached to the source document to be copied over to the new
document, turn off
Copy File.
This option is on by default if the source document has a file attached. If there is no file attached, the option is disabled.
- If you do not want the
source document's attribute values to be copied over to the new document, turn
off
Copy Attributes.
This option is on by default if the source document's folder is associated to an environment. If the source folder is not associated to an environment, the option is disabled.
When Copy Attributes is on and the destination folder shares the same environment as the source folder, attribute values will be retained when the document is copied. When Copy Attributes is on and the destination folder does not share the same environment as the source folder, attribute values will be retained for the attributes that are the same in both environments, otherwise the attribute values will be lost.
- If you do not want to
copy the document's versions, turn off
Copy Document Versions.
This option is on by default if the source document has versions. If the source document has no versions, or if the source document itself is a version (but not the active version), the option is disabled.
- If you do not want the
file that is attached to the source document to be copied over to the new
document, turn off
Copy File.
- In the
Destination Document section, do the
following:
- Set the destination
folder (the folder in which a copy of the document will be made).
By default, the source folder is also set as destination folder. Click Select if you want to change the destination folder. If you leave the source folder set as the destination folder, then a copy of the source document will be made in the source folder.
- Set the document name,
description, and file name for the new document.
By default, the new document is set to have the same document name, description, and file name of the source document.
If you use the source folder as the destination folder, then you must change both the document name and file name. If you copy the document to a different folder, you can keep the existing document name and file name, as long as there is not already a document in the destination folder that has the same document name or file name. A description for the document is optional.
Tip: Turn on the lock icon and check box next to the Document Name field (document name locking feature) if you want the file name to be the same as the document name (editing the document name will automatically change the file name). Turn off the check box if you want to edit the file name independently of the document name.
- Set the destination
folder (the folder in which a copy of the document will be made).
- Click
OK.
The dialog closes and a copy of the document is created in the destination folder.